Connect Google Cloud Platform (GCP)
This guide walks you through connecting a GCP project or organization to Onam using a service account with read-only access. You enable the required APIs, create the service account, assign six built-in read-only roles, and upload a JSON key (or configure keyless Workload Identity Federation). The connection is read-only: Onam never makes changes to your GCP environment.
Time to complete: ~20 minutes. GCP knowledge required: IAM basics, service accounts, gcloud CLI (optional).
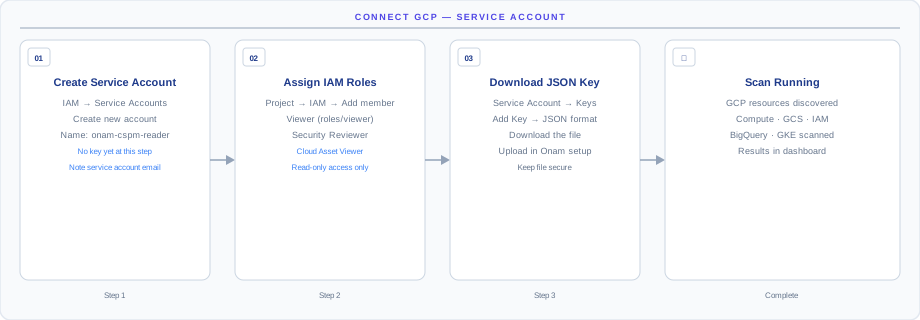
How the connection works
The diagram above shows the connection model end-to-end. Onam connects to GCP via a service account with read-only roles at the project (or organization) level. You create the service account, assign the roles, generate a JSON key, and upload the key in the Onam console — Onam then authenticates with the service-account credentials and reads resource configurations through the GCP APIs.
- Read-only roles only —
roles/viewer,roles/iam.securityReviewer,roles/cloudasset.viewer, and three more. No write actions are possible. - Scoped to the project (or organization) you grant — Onam cannot see projects you didn't assign roles in.
- Keys can be rotated at any time — rotate at least every 90 days, or skip keys entirely with Workload Identity Federation (available on Enterprise plans).
How the connection stays read-only: every role you assign in this guide is a Google-built read-only role — none contains a single write, delete, or setIamPolicy permission, and GCP IAM enforces that on every API call. The uploaded key is stored in AWS Secrets Manager, encrypted with KMS; disable or delete the key in GCP at any time and access ends instantly.Before you begin
- A GCP project with the
OwnerorSecurity Adminrole, to create service accounts and assign roles - Billing enabled on the GCP project
- An Onam account with at least the
tenant_adminrole
Step 1 — Enable APIs and create the service account
Enable the required APIs
# Enable all APIs required for scanning
gcloud services enable \
  cloudasset.googleapis.com \
  cloudresourcemanager.googleapis.com \
  iam.googleapis.com \
  compute.googleapis.com \
  container.googleapis.com \
  storage.googleapis.com \
  sqladmin.googleapis.com \
  monitoring.googleapis.com \
  logging.googleapis.com \
  securitycenter.googleapis.com \
  cloudkms.googleapis.com \
  dns.googleapis.com \
  run.googleapis.com \
  cloudfunctions.googleapis.com \
  bigquery.googleapis.com \
  redis.googleapis.com \
  --project=YOUR_PROJECT_ID
Or enable them in the Google Cloud Console.
Create the service account (GCP Console)
- Open IAM & Admin → Service Accounts
- Click Create Service Account
- Name:
cspm-scanner - Description:
Read-only scanner for Onam - Click Create and Continue
- Skip roles for now (assigned in Step 2)
- Click Done
- Copy the Service Account email (format:
cspm-scanner@PROJECT_ID.iam.gserviceaccount.com)
Create the service account (gcloud CLI)
PROJECT_ID=$(gcloud config get-value project)

gcloud iam service-accounts create cspm-scanner \
  --display-name="CSPM Scanner" \
  --description="Read-only scanner for Onam" \
  --project=$PROJECT_ID

SA_EMAIL="cspm-scanner@${PROJECT_ID}.iam.gserviceaccount.com"
echo "Service Account: $SA_EMAIL"
Step 2 — Assign read-only roles
Six built-in GCP roles are required. Each one grants read access to a specific area of GCP — there are no write actions in any of them.
| Role | What it grants | Why required |
|---|---|---|
roles/viewer | Basic read access to most GCP services | Core resource discovery |
roles/iam.securityReviewer | Read IAM policies | IAM posture analysis |
roles/cloudasset.viewer | Cloud Asset Inventory access | Comprehensive resource inventory |
roles/cloudkms.viewer | KMS key metadata read | Encryption posture analysis |
roles/container.clusterViewer | GKE cluster configuration read | Container security analysis |
roles/securitycenter.findingsViewer | Security Command Center findings | Threat detection enrichment |
PROJECT_ID=$(gcloud config get-value project)
SA_EMAIL="cspm-scanner@${PROJECT_ID}.iam.gserviceaccount.com"

# Core read access
gcloud projects add-iam-policy-binding $PROJECT_ID \
  --member="serviceAccount:${SA_EMAIL}" \
  --role="roles/viewer"

# IAM and security policy reading
gcloud projects add-iam-policy-binding $PROJECT_ID \
  --member="serviceAccount:${SA_EMAIL}" \
  --role="roles/iam.securityReviewer"

# Cloud Asset API (resource inventory)
gcloud projects add-iam-policy-binding $PROJECT_ID \
  --member="serviceAccount:${SA_EMAIL}" \
  --role="roles/cloudasset.viewer"

# KMS key metadata
gcloud projects add-iam-policy-binding $PROJECT_ID \
  --member="serviceAccount:${SA_EMAIL}" \
  --role="roles/cloudkms.viewer"

# GKE cluster details
gcloud projects add-iam-policy-binding $PROJECT_ID \
  --member="serviceAccount:${SA_EMAIL}" \
  --role="roles/container.clusterViewer"

# Security Command Center findings
gcloud projects add-iam-policy-binding $PROJECT_ID \
  --member="serviceAccount:${SA_EMAIL}" \
  --role="roles/securitycenter.findingsViewer"
Step 3 — Create a key and connect
Create a service account key
# Create and download the key
gcloud iam service-accounts keys create cspm-key.json \
  --iam-account=$SA_EMAIL \
  --project=$PROJECT_ID

echo "Key file created: cspm-key.json"
Treat cspm-key.json like a password. Do not commit it to version control, and delete the local copy immediately after uploading it to the Onam console.Connect in the Onam console
- In the Onam console, navigate to Onboarding → Connect Cloud Account
- Select Google Cloud Platform
- Upload the
cspm-key.jsonfile (or paste its contents) - Enter a Project Alias (friendly name)
- Select which Services to scan or keep the default (all)
- Click Validate Connection
After validation, delete the local key file:
rm cspm-key.jsonRun your first scan
- Navigate to Onboarding → Cloud Accounts
- Click the project you just added
- Click Run Scan Now — the first scan typically completes in 15–60 minutes depending on project size
You receive an in-app notification and an email when the scan completes.
Organization-wide scanning and keyless federation
Organization-level scanning (all projects)
To scan all projects in a GCP Organization, grant the roles at organization level — they inherit down to every project:
ORG_ID=$(gcloud organizations list --format='value(name)' | head -1)
ORG_ID=${ORG_ID#organizations/}

# Grant roles at org level (inherits to all projects)
gcloud organizations add-iam-policy-binding $ORG_ID \
  --member="serviceAccount:${SA_EMAIL}" \
  --role="roles/viewer"

gcloud organizations add-iam-policy-binding $ORG_ID \
  --member="serviceAccount:${SA_EMAIL}" \
  --role="roles/iam.securityReviewer"

gcloud organizations add-iam-policy-binding $ORG_ID \
  --member="serviceAccount:${SA_EMAIL}" \
  --role="roles/cloudasset.viewer"
Then connect each project in the Onam console using the same service account key.
Workload Identity Federation (keyless — recommended for production)
Instead of a JSON key, use Workload Identity Federation for keyless authentication:
# Create a Workload Identity Pool
gcloud iam workload-identity-pools create cspm-pool \
  --location=global \
  --display-name="CSPM Scanner Pool"

# Create a provider (AWS — Onam runs on AWS)
gcloud iam workload-identity-pools providers create-aws cspm-provider \
  --location=global \
  --workload-identity-pool=cspm-pool \
  --account-id=ONAM_PLATFORM_AWS_ACCOUNT_ID

# Bind the Service Account
gcloud iam service-accounts add-iam-policy-binding $SA_EMAIL \
  --role="roles/iam.workloadIdentityUser" \
  --member="principalSet://iam.googleapis.com/projects/PROJECT_NUMBER/locations/global/workloadIdentityPools/cspm-pool/*"
Contact support@onam.io to enable Workload Identity Federation for your Onam tenant.
What gets scanned
Onam evaluates 47 GCP services against 2,676 posture rules, plus 176 identity-focused CIEM rules — part of the 10,000+ rule registry spanning all seven supported clouds. New services are added on a quarterly cadence.
| Category | Services scanned |
|---|---|
| Compute | Compute Engine VMs · GKE Clusters and Nodes · Cloud Run Services · Cloud Functions · App Engine |
| Storage & Data | Cloud Storage Buckets · Cloud SQL Instances · Cloud Spanner · BigQuery Datasets · Firestore · Memorystore Redis · Cloud Bigtable |
| Networking | VPC Networks · Firewall Rules · Cloud Load Balancing · Cloud Armor WAF · Cloud DNS · VPC Service Controls |
| Identity & Security | IAM Bindings and Policies · Service Accounts · Cloud KMS Keys · Secret Manager · Security Command Center · Binary Authorization |
| Monitoring & Audit | Cloud Logging · Cloud Monitoring · Audit Logs configuration · Log Sinks |
The same service account also powers behavioral threat detection: Onam's CDR engine ingests Cloud Audit Logs (exported to a GCS bucket) and correlates them into threat findings.
Troubleshooting and key rotation
| Error | Cause | Fix |
|---|---|---|
Permission denied on project | roles/viewer not assigned at project level | Run the Step 2 role assignments again |
Cloud Asset API not enabled | API disabled | Run gcloud services enable cloudasset.googleapis.com |
Invalid key format | Key file corrupted during copy-paste | Re-download the JSON key file |
| GKE clusters not appearing | container.clusterViewer missing | Assign roles/container.clusterViewer |
| No KMS findings | cloudkms.viewer missing | Assign roles/cloudkms.viewer |
UNAUTHENTICATED | Service account key expired or deleted | Create a new key in Step 3 |
Key rotation
Rotate service account keys at least every 90 days (or move to Workload Identity Federation and skip keys entirely):
# Create a new key
gcloud iam service-accounts keys create cspm-key-new.json \
  --iam-account=$SA_EMAIL

# Upload the new key in the Onam console:
# Onboarding → Cloud Accounts → [your account] → Edit → Update Key

# Then delete the old key (list key IDs first)
gcloud iam service-accounts keys list --iam-account=$SA_EMAIL

gcloud iam service-accounts keys delete OLD_KEY_ID \
  --iam-account=$SA_EMAIL

# Delete the local file
rm cspm-key-new.json
Next steps
- Connect Kubernetes clusters — add in-cluster visibility for your GKE clusters.
- CSPM — how the 2,676 GCP rules become prioritized findings.
- Compliance frameworks — map GCP findings to CIS, NIST, PCI-DSS, and 78 other frameworks.
- Book a demo — walk through your first scan results with an Onam engineer.