Connect Oracle Cloud Infrastructure (OCI)
This guide walks you through connecting an OCI tenancy to Onam using a read-only IAM user and an API signing key. You generate an RSA key pair, create a dedicated user/group/policy with inspect and read verbs only, upload the public key, and enter the credentials in the Onam console. The connection is read-only: Onam never makes changes to your OCI environment.
Time to complete: ~20 minutes. OCI knowledge required: IAM users, groups, policies, API keys.
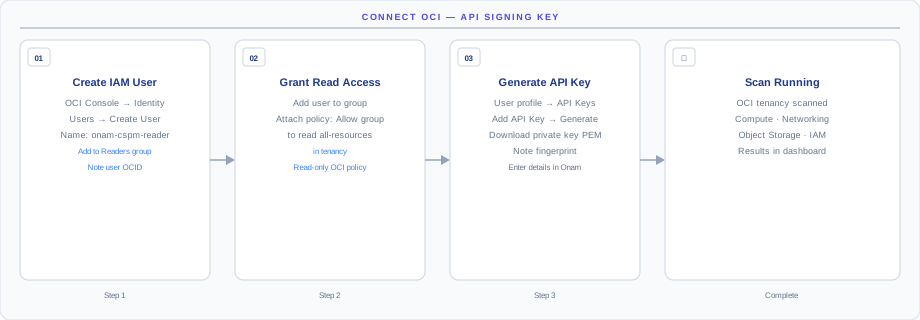
How the connection works
The diagram above shows the connection model end-to-end. Onam connects to OCI via a dedicated IAM user with API key signing, scoped to inspect/read permissions across all resources. You generate an API key pair, create the user/group/policy, upload the public key, and enter the credentials in the Onam console — Onam then signs API requests with the private key and reads resource configurations through the OCI REST APIs.
- Inspect + read permissions only — no write actions are possible.
- Scoped to the tenancy or compartments you grant — the policy you write controls Onam's reach.
- API keys can be rotated at any time — old keys can be revoked instantly without service interruption (rotation is hot-swappable).
How the connection stays read-only: the only policy statements the scanner group holds use OCI'sinspectandreadverbs — the two lowest of OCI's four permission verbs. There is nouseormanagegrant anywhere, and OCI IAM enforces that on every signed request. The private key is stored in AWS Secrets Manager, encrypted with KMS; delete the API key from the user in OCI and access ends instantly.
Before you begin
- An OCI tenancy with Administrator access to create IAM users, groups, and policies
opensslinstalled locally (for key generation)- An Onam account with at least the
tenant_adminrole
Step 1 — Generate an API signing key pair
# Create a directory for the keys
mkdir -p ~/.oci/cspm

# Generate RSA private key (2048-bit minimum, 4096 recommended)
openssl genrsa -out ~/.oci/cspm/cspm_api_key.pem 4096
chmod 600 ~/.oci/cspm/cspm_api_key.pem

# Extract the public key
openssl rsa -pubout \
  -in ~/.oci/cspm/cspm_api_key.pem \
  -out ~/.oci/cspm/cspm_api_key_public.pem

echo "Public key:"
cat ~/.oci/cspm/cspm_api_key_public.pem
Step 2 — Create the IAM user, group, and policy
Using the OCI Console
Create the user:
- Open OCI Console → Identity & Security → Users
- Click Create User
- Name:
cspm-scanner - Description:
Read-only scanner for Onam - Click Create
- Copy the User OCID from the user details page
Create the group and add the user:
- Navigate to Identity & Security → Groups and click Create Group
- Name:
CspmScanners, then click Create - Open the
CspmScannersgroup and click Add User to Group - Select
cspm-scanner
Create the policy:
- Navigate to Identity & Security → Policies
- Click Create Policy
- Name:
CspmScannerPolicy - Compartment: root (tenancy level — required for full coverage)
- Enter the two policy statements below and click Create
Allow group CspmScanners to inspect all-resources in tenancy
Allow group CspmScanners to read all-resources in tenancy
Using the OCI CLI
# Set your tenancy OCID
TENANCY_OCID="ocid1.tenancy.oc1..YOUR_TENANCY_OCID"

# Create user
oci iam user create \
  --name cspm-scanner \
  --description "Read-only scanner for Onam" \
  --compartment-id $TENANCY_OCID

USER_OCID=$(oci iam user list --compartment-id $TENANCY_OCID \
  --query "data[?name=='cspm-scanner'].id | [0]" --raw-output)

# Create group
oci iam group create \
  --name CspmScanners \
  --description "CSPM scanner group" \
  --compartment-id $TENANCY_OCID

GROUP_OCID=$(oci iam group list --compartment-id $TENANCY_OCID \
  --query "data[?name=='CspmScanners'].id | [0]" --raw-output)

# Add user to group
oci iam group add-user \
  --user-id $USER_OCID \
  --group-id $GROUP_OCID

# Create policy
oci iam policy create \
  --name CspmScannerPolicy \
  --compartment-id $TENANCY_OCID \
  --description "Onam read-only access" \
  --statements '["Allow group CspmScanners to inspect all-resources in tenancy","Allow group CspmScanners to read all-resources in tenancy"]'
Restrict scanning to specific compartments (optional)
OCI organizes resources into compartments. The tenancy-level policy above covers all compartments, including nested ones. To restrict scanning, scope the statements to a compartment instead:
Allow group CspmScanners to inspect all-resources in compartment COMPARTMENT_NAME
Allow group CspmScanners to read all-resources in compartment COMPARTMENT_NAME
Note that restricting to specific compartments excludes resources in other compartments from findings.
Step 3 — Upload the public key and gather values
Upload the API public key:
- In the OCI Console, navigate to Identity → Users → cspm-scanner
- Click API Keys → Add API Key
- Select Paste Public Key
- Paste the contents of
~/.oci/cspm/cspm_api_key_public.pem - Click Add
- Copy the Fingerprint shown (format:
aa:bb:cc:dd:ee:ff:...) - Copy the User OCID and Tenancy OCID from the same page
Gather the values needed to connect:
# Print all values needed for the Onam console
echo "Tenancy OCID: $TENANCY_OCID"
echo "User OCID: $USER_OCID"
echo "Region: $(oci iam region-subscription list --query 'data[?["is-home-region"]==\`true\`].["region-name"] | [0]' --raw-output)"
echo "Fingerprint: (copied from OCI Console in the previous step)"
echo "Private Key:"
cat ~/.oci/cspm/cspm_api_key.pem
Step 4 — Connect and run your first scan
- In the Onam console, navigate to Onboarding → Connect Cloud Account
- Select Oracle Cloud Infrastructure
- Fill in the five credential fields (table below)
- Click Validate Connection
| Field | Format / example |
|---|---|
| Tenancy OCID | starts with ocid1.tenancy.oc1.. |
| User OCID | starts with ocid1.user.oc1.. |
| Home Region | e.g. ap-mumbai-1, us-ashburn-1 |
| Fingerprint | the key fingerprint from Step 3 |
| Private Key | full contents of cspm_api_key.pem |
Run your first scan
- Navigate to Onboarding → Cloud Accounts
- Click the tenancy you just added
- Click Run Scan Now — the first scan typically completes in 15–60 minutes depending on tenancy size
You receive an in-app notification and an email when the scan completes.
What gets scanned
Onam evaluates 42 OCI services against 1,451 posture rules, plus 107 identity-focused CIEM rules — part of the 10,000+ rule registry spanning all seven supported clouds. New services are added on a quarterly cadence.
| Category | Services scanned |
|---|---|
| Compute | Compute Instances · OKE Clusters · Container Instances · Functions |
| Storage & Data | Object Storage Buckets · Block Volumes · File Storage · Autonomous Database · DB Systems · MySQL Database · NoSQL Database |
| Networking | VCNs · Security Lists · Network Security Groups · Load Balancers · Internet Gateways · NAT Gateways · DRG · WAF Policies |
| Identity & Security | IAM Users and Groups · Policies · Vaults and Keys · Secrets · Compartments · Identity Domains |
| Monitoring | Audit Logs · Events Service · Notifications · Logging configuration |
The same credentials also power behavioral threat detection: Onam's CDR engine ingests events from the OCI Audit service and correlates them into threat findings.
Troubleshooting and key rotation
| Error | Cause | Fix |
|---|---|---|
NotAuthenticated | Wrong fingerprint, key, or user OCID | Re-verify all values; re-upload the public key if needed |
NotAuthorized | Policy not created or not at tenancy level | Verify the policy is in the root compartment with the correct group name |
InvalidParameter: region | Unknown region identifier | Use the region identifier format (e.g., ap-mumbai-1, not Mumbai) |
| Resources missing from specific compartments | Policy scoped to wrong compartment | Move the policy to the root compartment level |
403 on a specific service | Policy missing the inspect verb for that service | The statements above cover all services; check group membership |
API key rotation
Rotate API keys every 90 days. Rotation is hot-swappable — upload the new key before removing the old one and scanning is never interrupted:
# Generate new key pair
openssl genrsa -out ~/.oci/cspm/cspm_api_key_new.pem 4096
openssl rsa -pubout \
  -in ~/.oci/cspm/cspm_api_key_new.pem \
  -out ~/.oci/cspm/cspm_api_key_new_public.pem

# Upload new public key in the OCI Console
# (Identity → Users → cspm-scanner → API Keys → Add API Key)

# Update the private key in the Onam console:
# Onboarding → Cloud Accounts → [your account] → Edit → Update Key

# Delete the old key from the OCI Console after confirming the new one works
Next steps
- Connect Alibaba Cloud — repeat the process for your next cloud; Onam covers all 7.
- CSPM — how the 1,451 OCI rules become prioritized findings.
- Compliance — map OCI findings to CIS, ISO 27001, PCI-DSS, and 78 other frameworks.
- Book a demo — walk through your first scan results with an Onam engineer.